IssueTracker
IssueTracker
 icon available in front of **Connect Existing/Deploy New** and click **Deploy New**, enter the Jira **URL** and then click **Deploy**.

## Connecting to the Existing Jira Board
You have an option to connect to the existing Jira board for your project.
To connect to the existing Jira board for a project, perform the following steps:
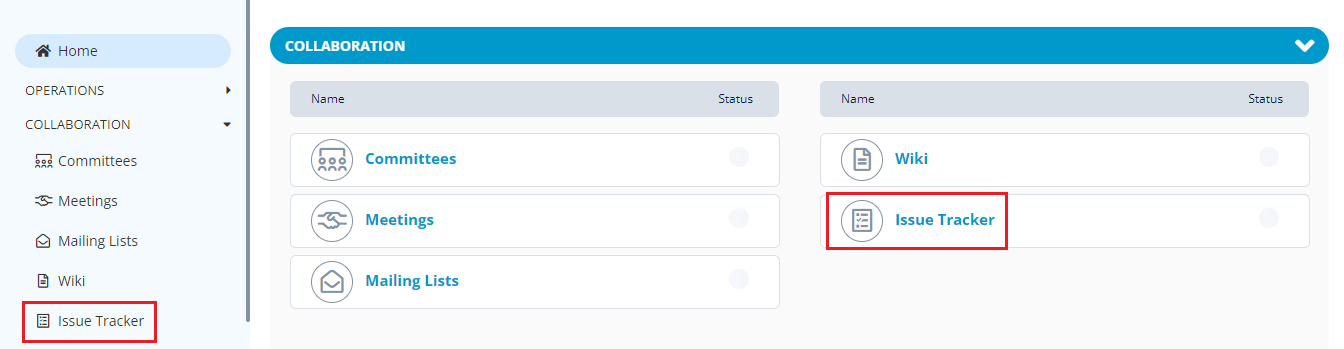
1.Search for the required project. The Project dashboard appears. Click **Issue Tracker** from the **Collaborations** tab.
2.The Issue Tracking page appears. Click the icon available in front of **Connect Existing/Deploy New** and click **Connect Existing**, enter the existing Jira **URL** and then click **Connect**.

## Adding a Service Administrator
After setting up the Jira board, you can add a Service Administrator to the Jira board.
To add a Service Administrator to the Jira board for a project, perform the following steps:
1.Search for the required project. The Project dashboard appears. Click **Issue Tracker** from the **Collaborations** tab.
2.In the Jira tab, click **+Add Service Administrator**.

3.The Add Service Administrator dialog box appears. Enter the **Full Name** of the user and the **Email Address** and click **Save**.

{% hint style="info" %}
If you want to update the existing Service Administrator details, click the edit
icon available in front of **Connect Existing/Deploy New** and click **Deploy New**, enter the Jira **URL** and then click **Deploy**.

## Connecting to the Existing Jira Board
You have an option to connect to the existing Jira board for your project.
To connect to the existing Jira board for a project, perform the following steps:
1.Search for the required project. The Project dashboard appears. Click **Issue Tracker** from the **Collaborations** tab.
2.The Issue Tracking page appears. Click the icon available in front of **Connect Existing/Deploy New** and click **Connect Existing**, enter the existing Jira **URL** and then click **Connect**.

## Adding a Service Administrator
After setting up the Jira board, you can add a Service Administrator to the Jira board.
To add a Service Administrator to the Jira board for a project, perform the following steps:
1.Search for the required project. The Project dashboard appears. Click **Issue Tracker** from the **Collaborations** tab.
2.In the Jira tab, click **+Add Service Administrator**.

3.The Add Service Administrator dialog box appears. Enter the **Full Name** of the user and the **Email Address** and click **Save**.

{% hint style="info" %}
If you want to update the existing Service Administrator details, click the edit  icon.
If you want to delete the existing Service Administrator, click the delete
icon.
If you want to delete the existing Service Administrator, click the delete  icon.
{% endhint %}
## Adding a Jira Project
You can add different Jira projects under your Jira board.
To add a Jira project to the Jira board, perform the following steps:
1.Search for the required project. The Project dashboard appears. Click **Issue Tracker** from the **Collaborations** tab.
2\. In the Jira Projects tab, click **+Add Jira Project**.

3.The Add Jira Project dialog box appears. Enter the **Project Name** and the **Project Link** and click **Save**.

---
# Agent Instructions
This documentation is published with GitBook. GitBook is the documentation platform designed so that both humans and AI agents can read, navigate, and reason over technical content effectively. Learn more at gitbook.com.
## Querying This Documentation
If you need additional information that is not directly available in this page, you can query the documentation by asking a question.
Perform an HTTP GET request on the following URL with the `ask` and `goal` query parameters:
```
GET https://docs.linuxfoundation.org/lfx/project-control-center/v1-prior-version/it-services-for-a-project/issue-tracking-for-a-project.md?ask=
icon.
{% endhint %}
## Adding a Jira Project
You can add different Jira projects under your Jira board.
To add a Jira project to the Jira board, perform the following steps:
1.Search for the required project. The Project dashboard appears. Click **Issue Tracker** from the **Collaborations** tab.
2\. In the Jira Projects tab, click **+Add Jira Project**.

3.The Add Jira Project dialog box appears. Enter the **Project Name** and the **Project Link** and click **Save**.

---
# Agent Instructions
This documentation is published with GitBook. GitBook is the documentation platform designed so that both humans and AI agents can read, navigate, and reason over technical content effectively. Learn more at gitbook.com.
## Querying This Documentation
If you need additional information that is not directly available in this page, you can query the documentation by asking a question.
Perform an HTTP GET request on the following URL with the `ask` and `goal` query parameters:
```
GET https://docs.linuxfoundation.org/lfx/project-control-center/v1-prior-version/it-services-for-a-project/issue-tracking-for-a-project.md?ask=